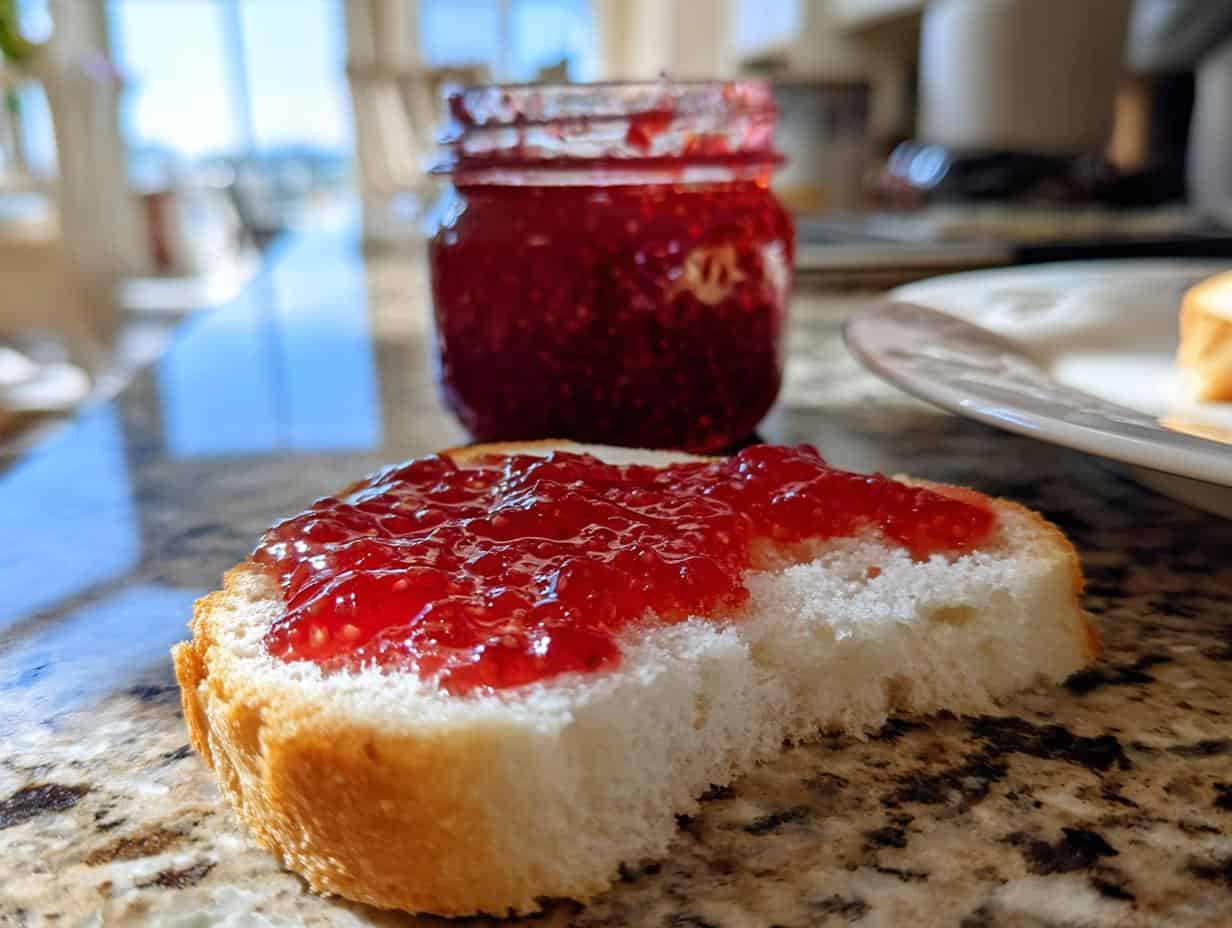
Oh, friends, let’s talk about something seriously joyful: homemade jam! And not just any jam, but *strawberry jam*. Forget that stuff from the store – once you taste your own, you’ll never go back. I promise! This *strawberry jam recipe* is so easy, even if you think you can’t “jam,” you totally can. It’s seriously rewarding.
I remember the first time I made jam with my grandma. I was probably, like, eight, and mostly just made a mess. But the smell! The taste! It was pure summer magic in a jar. And honestly, that’s what this *strawberry jam recipe* is all about – bottling up a little bit of sunshine. So, get ready to make some memories (and seriously delicious jam!).
Why You’ll Love This Strawberry Jam Recipe
Okay, so why should you even *bother* making your own strawberry jam? Trust me, there are a ton of reasons! This isn’t your grandma’s super complicated, all-day affair. This 
Benefits of This Strawberry Jam Recipe
-
Fresh and delicious taste
-
Simple and straightforward instructions
-
Customizable to your preferred sweetness
-
Uses common kitchen equipment
-
Great for gifting to friends and family
-
A rewarding and satisfying experience
-
Preserves the taste of summer
Essential Equipment for Your Strawberry Jam Recipe
Alright, let’s gather our gear! You don’t need a ton of fancy stuff to whip up this *strawberry jam recipe*, but a few key tools will make your life SO much easier. Think of it as setting yourself up for jam-making success! Here’s what you’ll definitely want on hand:
Must-Have Tools for Strawberry Jam Recipe
-
Large pot (stainless steel or enamel)
-
Sterilized canning jars and lids
-
Jar lifter
-
Ladle
-
Magnetic lid wand (optional)
-
Canning funnel (optional)
Strawberry Jam Recipe Ingredients: Freshness is Key
Okay, listen up, because this is important! With any recipe, the ingredients matter, but with *strawberry jam*, freshness is EVERYTHING. Seriously. Don’t even THINK about using those sad, pale strawberries from the back of the fridge. We want vibrant, juicy berries bursting with flavor for the best *strawberry jam recipe* ever!
Ingredient Breakdown for the Best Strawberry Jam Recipe
-
4 cups crushed fresh strawberries
Make sure those berries are ripe, like, *really* ripe! And measure ’em *after* you crush them, okay?
-
4 cups granulated sugar
Yep, it’s a lot of sugar, but trust me, it’s necessary! Measure it accurately, though, or your jam might not set properly. Oops!
-
1/4 cup fresh lemon juice
Freshly squeezed is a MUST! Bottled stuff just doesn’t have the same zing. Plus, the acidity helps the jam set. Win-win!
-
1 package powdered pectin
Look for the standard 1.75 ounce box. This is what helps thicken the jam, so don’t skip it!
Step-by-Step Guide: How to Make Strawberry Jam Recipe
Alright, here’s where the magic happens! Don’t be intimidated, this *strawberry jam recipe* is totally doable. Just follow these steps, and you’ll be slathering homemade jam on everything in no time. Trust me, it’s easier than you think!
Preparing Your Strawberry Jam Recipe: A Detailed Guide
-
Sterilize Jars and Lids
Okay, this is SUPER important! You don’t want any funky bacteria ruining your beautiful jam. Put your jars and lids in a big pot of boiling water for at least 10 minutes. Make sure they’re completely submerged! This kills off anything that could cause spoilage.
-
Combine Ingredients
Now, in your large pot (the one you’re *not* using for the jars!), dump in your crushed strawberries, sugar, and pectin. Give it a good stir to combine everything. We want that pectin and sugar all mixed in evenly with the strawberries.
-
Bring to a Boil
Turn the heat to medium-high and stir, stir, stir! You want to bring the mixture to a full rolling boil. What’s a “full rolling boil,” you ask? It means the jam is bubbling like crazy and doesn’t stop even when you stir it. Keep stirring, though, or it’ll stick and burn!
-
Boil Hard
Once you’ve reached that full rolling boil, set a timer for *exactly* 1 minute and keep stirring! This is crucial for getting the jam to set properly. “Boil hard” means you’re maintaining that intense bubbling the *entire* time!
-
Remove Foam
Take the pot off the heat. You’ll probably see some foamy stuff on top – that’s just impurities from the strawberries. Skim it off with a spoon. It’s not harmful, but it doesn’t look very pretty.
-
Ladle into Jars
Carefully ladle the hot jam into your sterilized jars, leaving about 1/4 inch of headspace at the top. That space is important for creating a good seal! Wipe the rims of the jars clean with a damp cloth – any drips can prevent a proper seal.
-
Process in Water Bath
Now, carefully lower the filled jars into a boiling water bath (the same pot you used to sterilize them is fine!). Make sure the water covers the jars by at least an inch. Bring the water back to a boil and process for 10 minutes. Heads up – if you live at a high altitude, you’ll need to add more time! Check a canning guide for specifics. After processing, turn off the heat and let the jars sit in the hot water for 5 minutes before removing them. This helps prevent siphoning (when jam leaks out of the jars).
Tips for Perfect Strawberry Jam Recipe
Want to make sure your *strawberry jam recipe* is a total success? Of course, you do! Here are a few little secrets I’ve learned over the years to help you nail it every single time. These little tricks really make a difference!
Expert Advice for Your Strawberry Jam Recipe
-
Adjust sugar to taste
Strawberries can vary SO much in sweetness! Taste your crushed berries before you add the sugar. If they’re super sweet, you can reduce the sugar by up to a cup. If they’re tart, you might want to add a little extra. Trust your taste buds!
-
Ensure proper headspace
That 1/4 inch of empty space at the top of the jar is super important! It allows a vacuum to form during processing, which creates a tight seal. Not enough headspace, and your jars might not seal properly. Too much, and the jam could discolor at the top. Just stick to 1/4 inch, and you’ll be golden!
-
Test for a good seal
After the jars have cooled completely (give them at least 12 hours), press down on the center of each lid. If it doesn’t flex or pop, it’s sealed! If it pops, it didn’t seal properly, and you’ll need to refrigerate that jar and use the jam within a few weeks. Bummer, but better safe than sorry!
-
Use fresh, ripe strawberries
I know I already mentioned this, but it’s worth repeating! The flavor of your jam will only be as good as the strawberries you use. So, splurge on the good ones! You won’t regret it.
-
Don’t overcook the jam
Overcooked jam can be thick, gloppy, and dark in color. Yuck! Stick to that one-minute hard boil, and you’ll be fine. The jam will thicken as it cools.
Strawberry Jam Recipe Variations: Get Creative
Okay, so you’ve mastered the basic *strawberry jam recipe*. Awesome! Now, let’s get a little wild, shall we? The beauty of making your own jam is that you can totally customize it to your liking. Wanna add a little zing? A subtle spice? Go for it! Here are a few ideas to get your creative juices flowing:
Creative Twists on Your Strawberry Jam Recipe
-
Strawberry Basil Jam
Seriously, don’t knock it ’til you try it! Adding a few fresh basil leaves during the last few minutes of cooking gives the jam a surprisingly sophisticated flavor. It’s SO good on toast with goat cheese!
-
Strawberry Vanilla Jam
Vanilla and strawberries are a match made in heaven! Stir in a teaspoon of vanilla extract after removing the jam from the heat, or for a more intense flavor, add a split vanilla bean to the pot while it’s cooking. Just remove the bean before ladling the jam into jars.
-
Strawberry Rhubarb Jam
If you’re looking for a little tartness, try adding some diced rhubarb to the strawberry mixture. It balances out the sweetness perfectly and adds a lovely pink hue to the jam.
-
Spiced Strawberry Jam
For a cozy, warming twist, add a pinch of cinnamon, nutmeg, or cloves to the jam while it’s cooking. It’s especially delicious during the fall and winter months! Think of it as Christmas in a jar!
Frequently Asked Questions About Strawberry Jam Recipe
Making jam can seem a little mysterious, right? Don’t sweat it! I get asked the same questions all the time about my *strawberry jam recipe*. So, I figured I’d put ’em all in one place. Hopefully, this clears things up!
Common Questions About Making Strawberry Jam Recipe
-
Why is my jam runny?
Okay, runny jam is the WORST! Usually, it means you didn’t boil it long enough. That full rolling boil is key for activating the pectin. Also, make sure you’re using the right amount of pectin! Too little, and your jam won’t thicken up. Oops!
-
How do I know if my jam has set?
Ah, the million-dollar question! My favorite trick is the “wrinkle test.” Before you start making the jam, pop a couple of small plates in the freezer. When you think the jam is ready, drop a spoonful onto one of the cold plates and put it back in the freezer for a minute. Then, push the jam with your finger. If it wrinkles, it’s set! If not, boil it for another minute or two and try again.
-
How long does homemade strawberry jam last?
If your jars sealed properly (no popping when you press the lid!), your *strawberry jam* can last for up to a year in a cool, dark place. Once you open a jar, though, you’ll need to keep it in the fridge. It’ll be good for a few weeks… if it lasts that long! (Spoiler alert: it probably won’t!)
-
Can I use frozen strawberries?
You *can* use frozen strawberries, but fresh is always best! Frozen berries tend to release more water, so you might need to cook the jam a bit longer to get it to the right consistency. Also, the flavor might not be quite as vibrant. But hey, if it’s the middle of winter and you’re craving some *strawberry jam*, frozen berries will definitely do in a pinch!
-
What is the best way to sterilize jars?
Alright, let’s talk sterilization again, because it’s that important! The easiest way is to boil the jars and lids in a large pot of water for 10 minutes. Make sure the water covers them completely! You can also sterilize them in the dishwasher if it has a sterilize setting. Just make sure they’re still hot when you fill them with jam!
Storing Your Homemade Strawberry Jam Recipe
Okay, so you’ve made a batch of this amazing *strawberry jam recipe*… now what? Knowing how to store it properly is key to enjoying that summery goodness for as long as possible! Here’s the lowdown:
Best Practices for Storing Strawberry Jam Recipe
-
Sealed Jars
If your jars sealed properly (that little button on the lid is sucked down tight!), you can store them at room temperature in a cool, dark place – like a pantry or cupboard. Properly sealed jars of *strawberry jam* will last for up to a year! Isn’t that awesome?!
-
Unsealed Jars
Didn’t get a good seal on one (or more!) of your jars? No biggie! Just pop it in the fridge. Unsealed jam will keep for a few weeks in the refrigerator. Just keep an eye out for any mold or funky smells – if anything seems off, toss it! But honestly, it’ll probably be gone long before that!
Nutritional Information for Strawberry Jam Recipe
Alright, let’s talk numbers for a sec. Now, I’m no nutritionist, so please don’t take this as gospel, okay? The nutritional information for this *strawberry jam recipe* can vary a LOT depending on the exact strawberries you use, the brand of pectin, and how much sugar you sneak in (oops!). So, this is just a general ballpark estimate, alright? Use it as a guide, not a hard-and-fast rule!
Ready to Make Your Own Strawberry Jam Recipe?
So, what are you waiting for?! Seriously, grab some strawberries and get jamming! And hey, if you try this recipe, leave a comment and let me know how it turned out! Or even better, share a picture on social media and tag me – I wanna see your jam creations!
Print
Astonishing Strawberry Jam Recipe in Just 1 Minute
- Prep Time: 15 minutes
- Cook Time: 20 minutes
- Total Time: 35 minutes
- Yield: 6 half-pint jars 1x
- Category: Dessert
- Method: Boiling
- Cuisine: American
- Diet: Vegetarian
Description
Easy homemade strawberry jam recipe perfect for preserving fresh strawberries.
Ingredients
- 4 cups crushed strawberries
- 4 cups sugar
- 1/4 cup lemon juice
- 1 package powdered pectin
Instructions
- Prepare your jars and lids by sterilizing them in boiling water.
- Combine strawberries, sugar, and pectin in a large pot.
- Bring the mixture to a full rolling boil that cannot be stirred down, stirring constantly.
- Boil hard for 1 minute, stirring constantly.
- Remove from heat and skim off any foam.
- Ladle hot jam into sterilized jars, leaving 1/4 inch headspace.
- Process in a boiling water bath for 10 minutes.
Notes
- Adjust sugar based on the sweetness of your strawberries.
- Ensure proper headspace for a good seal.
- Processing time may vary based on altitude.
Nutrition
- Serving Size: 1 tablespoon
- Calories: 50
- Sugar: 12g
- Sodium: 0mg
- Fat: 0g
- Saturated Fat: 0g
- Unsaturated Fat: 0g
- Trans Fat: 0g
- Carbohydrates: 13g
- Fiber: 0g
- Protein: 0g
- Cholesterol: 0mg

